Mission Types
Phoenix II —FAQ (IOS)

BOOKMARK
FAQ (IOS) by light_rock_zz
Version: 5.3 | Updated: 07/29/2025
FAQ of the Month Winner: January 2020 | Highest Rated Guide
Mission Types
The different combinations of Invader weaponries you will face in missions
Some sets of Invader weaponries / turrets always seem to appear alongside with others, while some never appear alongside some others. These set of Invader weaponries / turrets that always appear together can be classified into what could be called Mission Types.
- Note that these mission types are defined by this guide and not used in-game.
The table below shows the list of all possible Invader weaponries that can appear in all mission types.
| Mission Type | General | Pellet MIRV | Laser MIRV | Doomsday Weapons | Number of possible Invader weaponries in Mission Type | |||||||||
|---|---|---|---|---|---|---|---|---|---|---|---|---|---|---|
| Pellet | Dart | Shuriken | Boomerang | Laser | Doomsday Laser | Doomsday Bomb | Doomsday Super MIRV | |||||||
| Shuriken/MIRVA | ✓ | ✓ | ✓ | ✓ | ✓ | 5 | ||||||||
| Shuriken/MIRVB | ✓ | ✓ | ✓ | 3 | ||||||||||
| Dart/MIRV | ✓ | ✓ | ✓ | ✓ | 4 | |||||||||
| Shuriken/Boomerang/MIRV | ✓ | ✓ | ✓ | ✓ | ✓ | 5 | ||||||||
| Dart/Boomerang/Pellet | ✓ | ✓ | ✓ | ✓ | 4 | |||||||||
| General (−Lasers) | ✓ | ✓ | ✓ | ✓ | Does not appear in General-type missions | 4 | ||||||||
| General (−Boomerangs) | ✓ | ✓ | ✓ | ✓ | Does not appear in General-type missions | ✓ | ✓ | 6 | ||||||
| General (−Pellets) | ✓ | ✓ | ✓ | ✓ | ✓ | ✓ | 6 | |||||||
| Dart/Boomerang/Laser | ✓ | ✓ | ✓ | ✓ | 4 | |||||||||
| Dart/Pellet/Laser | ✓ | ✓ | ✓ | ✓ | ✓ | 5 | ||||||||
| Laser/Shuriken/Pellet | ✓ | ✓ | ✓ | ✓ | ✓ | 5 | ||||||||
| Laser/Shuriken | (·) | ✓ | ✓ | (·) | ✓ | ✓ | ✓ | 5+2 | ||||||
| Laser/Pellet | ✓ | ✓ | ✓ | ✓ | 4 | |||||||||
| Lasers Only | ✓ | ✓ | ✓ | 3 | ||||||||||
| Number of mission types Invader weaponry appears | 10+1 | 7 | 8 | 5 | 8 | 4+1 | 4 | 6 | 8 | 3 | ||||
(·) While pellets and MIRVs ![]() appear in Laser/Shuriken missions, they only appear because of the presence of Doomsday Super MIRVs
appear in Laser/Shuriken missions, they only appear because of the presence of Doomsday Super MIRVs ![]() . Only Laser MIRV
. Only Laser MIRV ![]() turrets are present, pellet MIRV turrets do NOT appear.
turrets are present, pellet MIRV turrets do NOT appear.
Using the table above, there are some rules that this guide has defined when it comes to mission type naming:
- If the mission is a General-type mission, expect pellets, darts, shurikens, boomerangs
 & lasers
  in roughly equal proportions.
- MIRVs
 or Laser MIRVs
  do NOT appear in General-type missions.
 - Note that there is no TRUE General-type mission, as all 3 General-type missions have one Invader weaponry missing from the above list of 5 Invader weaponries, indicated in name.
- MIRVs
- Otherwise, the Invader weaponries that are part of the mission type's name are the most dominant Invader weaponries you’ll face.
- If Laser is the first Invader weaponry of the mission type name, then Laser MIRVs are also present.
- If MIRV is one of the Invader weaponries in the mission type naming, pellets are also present (since MIRVs release pellets upon triggered).
- If Laser
- Caged MIRVs
 do NOT affect the mission type. Thus, they are not important in mission type naming.
- Instead, a currency sign symbol (¤) will be appended to the mission type to indicate the presence of Caged MIRVs .
- Instead, a currency sign symbol (¤) will be appended to the mission type to indicate the presence of Caged MIRVs
The Mission Intel detailed in this guide assumes the worst case scenario (excluding Condors ![]() and Rocs
and Rocs ![]() , as their appearance do not affect the mission type and have no pattern). In the actual missions, it is expected that some Invader weaponry may not show up on the mission intel. Here are the cases to take note of:
, as their appearance do not affect the mission type and have no pattern). In the actual missions, it is expected that some Invader weaponry may not show up on the mission intel. Here are the cases to take note of:
- Doomsday weapons may not always appear. This applies to all ranks, including Marshal
 .
.- It is rare to have BOTH Doomsday Lasers
 and Doomsday Bombs
  in one mission.
 - In other ranks except Marshal , it is much rarer for Doomsday Super MIRVs
 to appear.
 - In Silver ranks, it is much rarer for Doomsday Lasers or Doomsday Bombs to appear.
- It is rare to have BOTH Doomsday Lasers
- MIRVs may not always appear in bronze


 or silver

 ranks, even though the mission type may be a Dart/MIRV or Shuriken/Boomerang/MIRV mission.
- MIRVs also may not always appear in bronze ranks, even though the mission type may be Shuriken/MIRV mission.
- MIRVs
- Lasers may not always appear in bronze ranks.
- There are very rare cases where Laser MIRVs do not appear in Laser/Pellet missions where they are supposed to appear.
Based on the mission intel and mission venue, you can determine the mission types mentioned in this guide. This allows you to pick the most appropriate ship from the get-go. Just follow the flowchart shown below. (Note that I don't really bother to show for bronze ![]()
![]()
![]() ranks because it matters too little in those ranks.)
ranks because it matters too little in those ranks.)
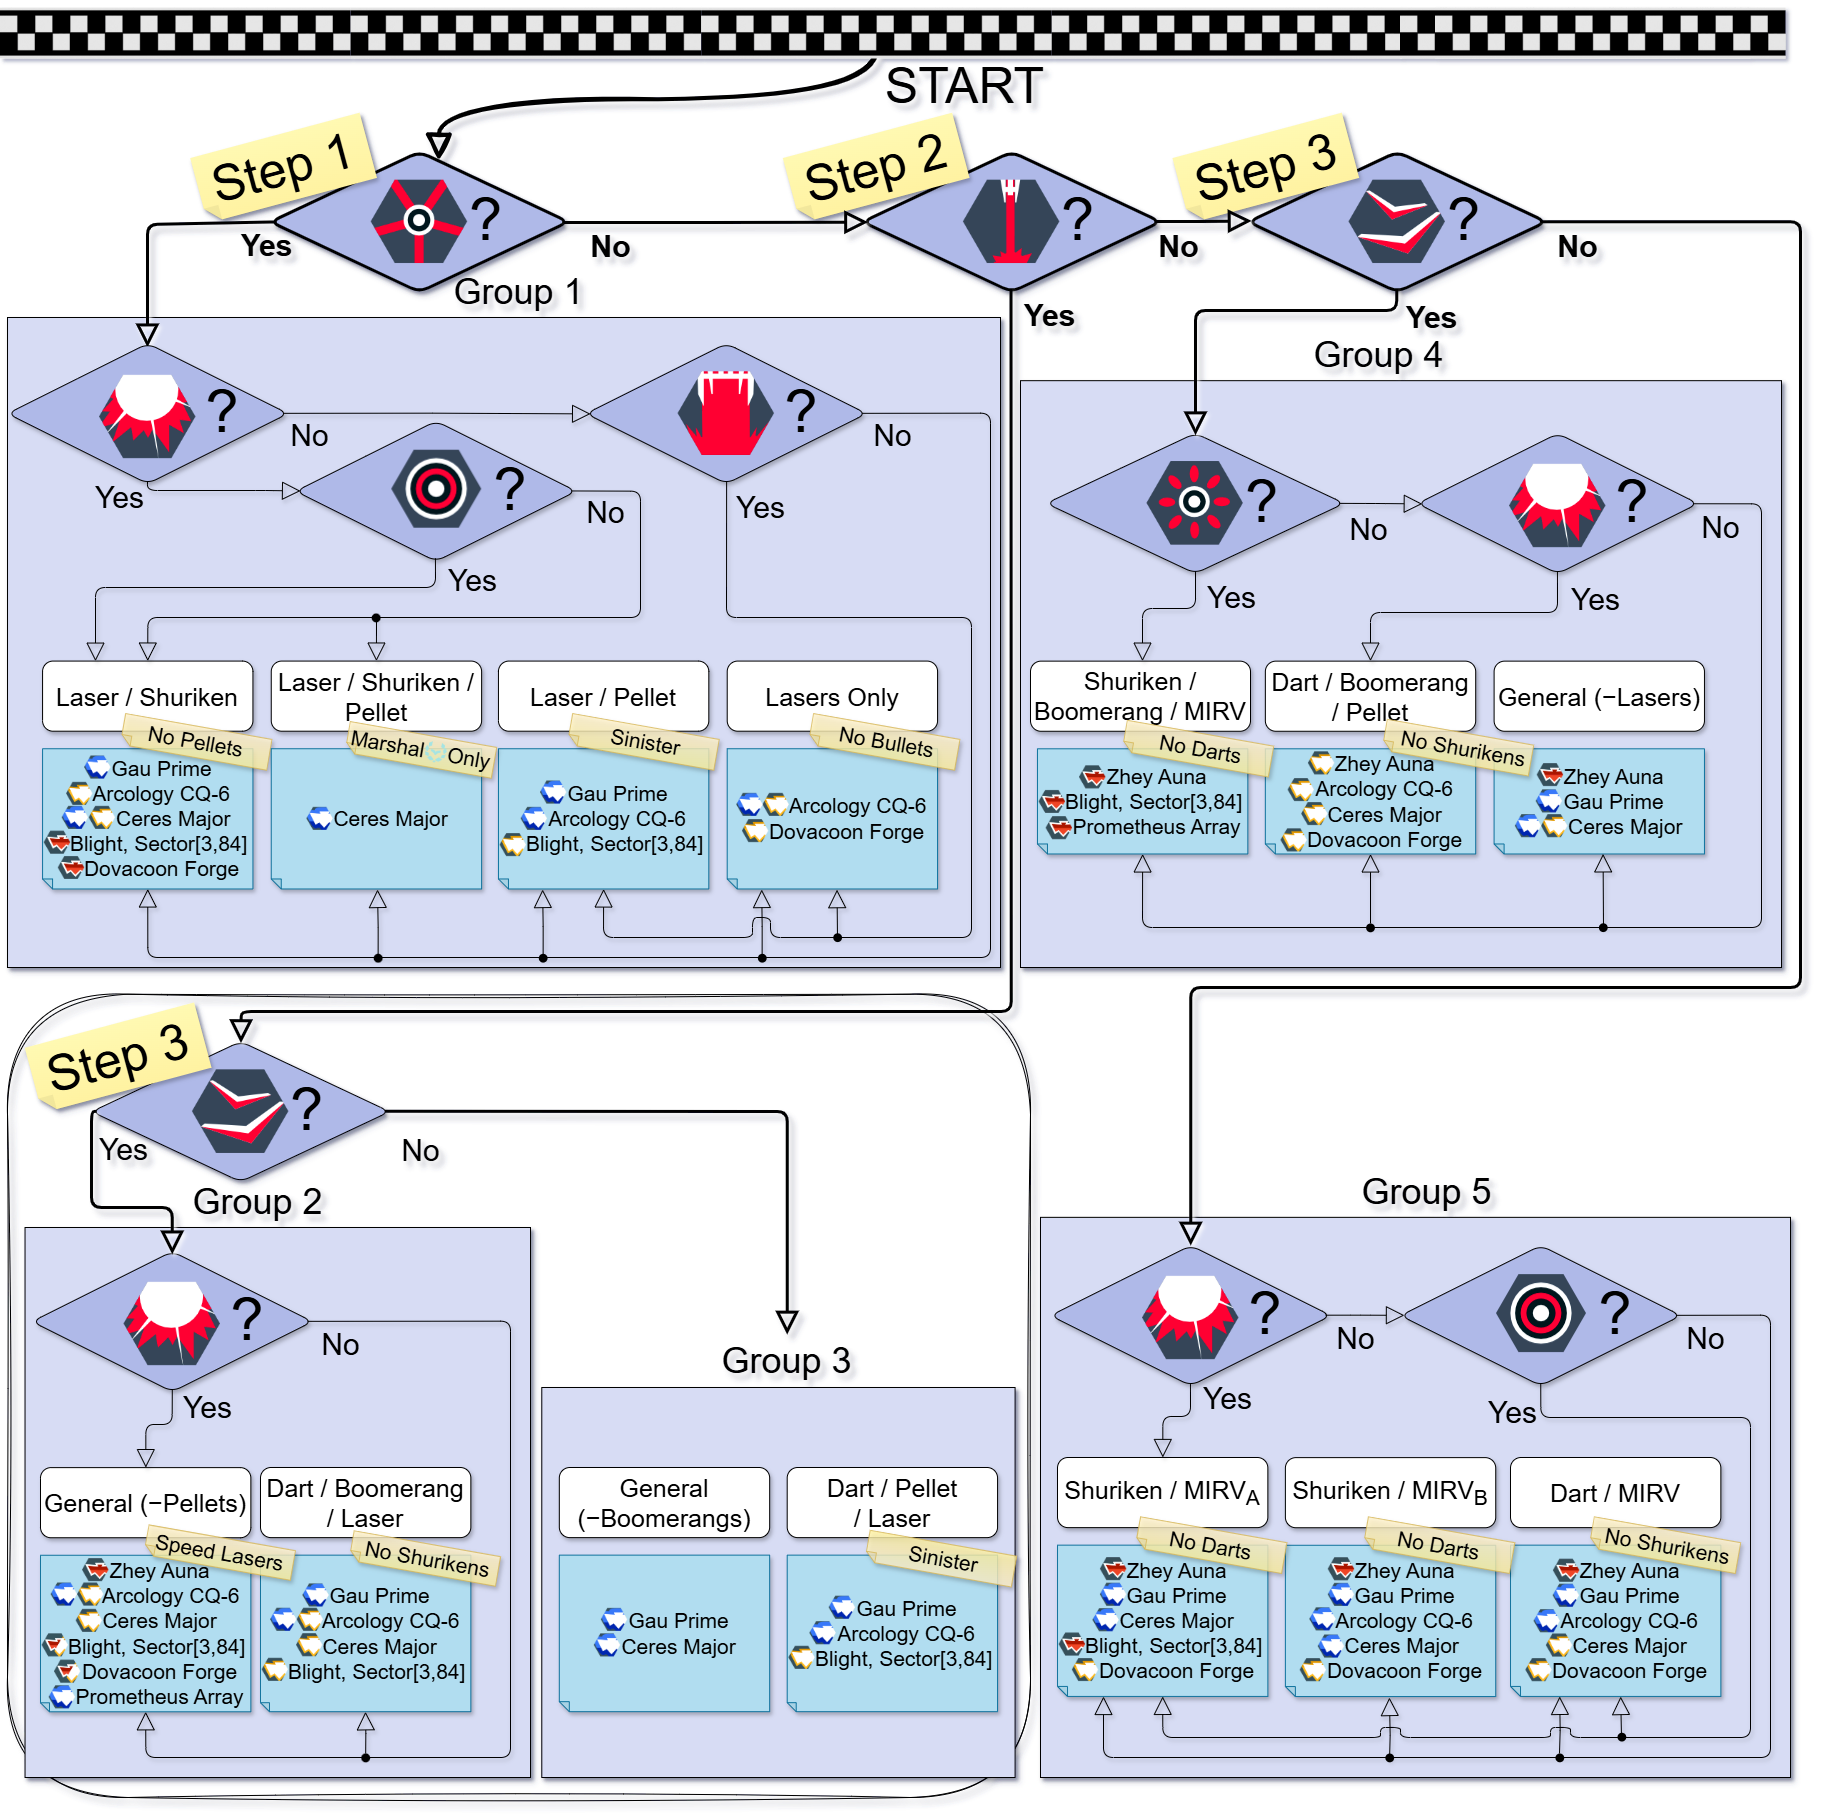
Here are the steps to follow to determine the mission type. 80-90% of the time, you should be able to determine the mission type without even playing the mission.
- Look out for Laser MIRVs .
- The presence of Laser MIRVs indicate a laser heavy mission, which greatly reduces the mission types to Group 1: [Lasers Only, Laser/Pellet & Laser/Shuriken (or Laser/Shuriken/Pellet, only in Marshal ) ].
- The presence of Doomsday Super MIRVs in the mission intel confirms the mission type of Laser/Shuriken. √ Done! √
- The presence of Doomsday Bombs in the mission intel confirms the mission type of Laser/Shuriken or Laser/Shuriken/Pellet (In the case of Marshal rank). For all ranks except Marshal rank, this is enough to confirm that the mission type is Laser/Shuriken.
- The presence of Doomsday Lasers narrows it down to Lasers Only or Laser/Pellet.
- Skip to Step 4.
- The presence of Doomsday Super MIRVs
- The presence of Laser MIRVs indicate a laser heavy mission, which greatly reduces the mission types to Group 1: [Lasers Only, Laser/Pellet & Laser/Shuriken (or Laser/Shuriken/Pellet, only in Marshal
- If there are no Laser MIRVs, look out for Lasers in the mission.
- The presence of lasers cuts down the mission types to either Group 2: [Dart/Boomerang/Laser & General (−Pellets)] or Group 3: [General (−Boomerangs) & Dart/Pellet/Laser].
- The lack of lasers cuts down the mission types to either Group 4: [Dart/Boomerang/Pellet, General (−Lasers) & Shuriken/Boomerang/MIRV] or Group 5: [Shuriken/MIRVA, Shuriken/MIRVB & Dart/MIRV], at least for silver ranks and above.
- Look out for Boomerangs . This helps you to choose between Group 2 & 3, or between Group 4 & 5.
- If there are boomerangs, go to either Group 2 or 4. If there are no boomerangs, go to Group 3 or 5.
- If Group 2 is confirmed, look for Doomsday Bombs . If there are, then the mission type is confirmed to be General (−Pellets). √ Done! √
- If Group 4 is confirmed, look for MIRVs . If there are, then the mission type is confirmed to be Shuriken/Boomerang/MIRV. √ Done! √
- If not, look for Doomsday Bombs . If there are, then the mission type is confirmed to be Dart/Boomerang/Pellet. √ Done! √
- If not, look for Doomsday Bombs
- If Group 5 is confirmed, look for Doomsday Bombs . If there are, then the mission type is confirmed to be Shuriken/MIRVA. √ Done! √
- If not, look for Doomsday Super MIRVs . If there are, then the mission type is either Shuriken/MIRVA or Dart/MIRV.
- If not, look for Doomsday Super MIRVs
- Look at the mission venue AND the Invader affinity. This is often the deciding factor between which 1 of the 2 mission types is it in the Group. Refer to the blue sticky notes in the flowchart above for the venues and the associated Invader affinities (if required) that each of the mission types can appear on. Each mission venue can only have 2 affinities of Invaders, as listed:
 Zhey Auna: Unprotected
  & Armored
  Invaders
 Gau Prime: Armored (Only for bronze ranks) & Shielded
  Invaders
 Arcology CQ-6: Armored & Shielded Invaders
 Ceres Major: Armored & Shielded Invaders
 Blight, Sector[3,84]: Unprotected & Armored Invaders
 Dovacoon Forge: Unprotected & Armored Invaders
 Prometheus Array: Unprotected & Shielded Invaders
- If the above 4 steps still didn't work to determine the mission type, at the very least, you would have determined the Group. Unfortunately, at this point, the only thing that you can do is to play the mission to distinguish between 2 mission types in a Group. The small yellow sticky notes in the flowchart shows you what to look for each of the Groups.
- Look out for Sinister Invaders. These Invaders have camouflage patterns on their body.
- You can still opt to suicide before killing any Invader, if you decide to change ship. Or if you can simply decide to just not attempt the mission entirely since you are not considered to have attempted the mission if you did not kill a single Invader at wave 1-1.
- If not, look for the presence of shurikens (more common deciding factor) or darts (less common deciding factor).
- While possible to find out this at wave 1-1 (and change ship/suicide), you might have to play through quite some way into the mission to find out for the presence of shurikens or darts.
- Looking out for shurikens is a definitive way to determine the mission type within each Group, if you do not want to remember so much.
- In lower ranks, checking for shurikens can take very long since some mission types have shurikens appear only in much later Acts.
- In Marshal rank only, pellets are the deciding factor between Laser/Shuriken and Laser/Shuriken/Pellet.
- Look out for Sinister Invaders. These Invaders have camouflage patterns on their body.
In total, there are 15 mission types, 2 of which are easier versions of their respectively mentioned mission types. The mission types can be divided into 3 categories.
- Bullets Only - Absolutely no lasers.
- Mixed Bullets & Lasers - Has a good mix of bullets and lasers, in a somewhat balanced proportion.
- Laser Heavy - Usually very laser heavy missions. Most importantly, they are the only mission types that contain Laser MIRVs.
For the following sub-sections which detail the mission types in all 3 categories, take note of the following:
- If an Aura
 or Zen
  is not mentioned for strategies under a certain mission type, the Aura or Zen is neutral against that mission type. This means it works fine but has no particular advantage or disadvantage for that mission type.
 - There are reasons why some ships are repeated in multiple sections, while others get less mention.
- For example, a ship/apex
 in the speedrunning section may not always make it over to the fun section.
 - While the ship/apex is fast, it may be frustratingly hard to do so.
- For example, a ship/apex
- Despite my best efforts to put ships and apexes into each section, I may accidentally omit a few ships/apexes and mis-classify a few because there are simply too many ships and apexes.
- Feel free to contact me and dispute it. I will look into your feedback with careful consideration.
This guide will only go into the mission types without considering the affinities in the strategies explained below.
- A table showing what ships can be used will be included.
- If a ship is mentioned, both of its apexes can also be used.
- Some of the columns in the table for some mission types may be obscured by an inline text spoiler which looks something like this.
- This is because the associated affinity type for that mission type does NOT exist.
- For example, Unprotected Invaders cannot appear in Dart/Boomerang/Pellet missions.
- For example, Unprotected
- While this guide recommends to use a ship of a main weapon
 affinity that matches the Invaders' affinities, this may not always be possible, especially in the early game.
 - Thus, this guide gives you the option to use ships whose main weapon affinity does not match the Invader affinity.
- To read the text, select all text (by using Ctrl + A on the computer keyboard), or highlight the text in the inline text spoiler.
- This is because the associated affinity type for that mission type does NOT exist.
- In some columns of some mission types (which contain one affinity), some apexes may not appear, like Missile Swarm
 Armor Piercing
  or Laser Storm
  Shield Breaker
  , because it either makes no sense or no difference to use the apex in another affinity of that mission type.
- Reflex EMP
 High Damage apexes also don't appear in mission types that do not have Unprotected Invaders as the base ship is usually already in another affinity of that mission type.
- This implies you can already use the Reflex EMP High Damage apex too.
- This implies you can already use the Reflex EMP
- Reflex EMP
- As some mission types are extremely similar to each other, they will be under one section since they share most of the strategies.
These strategies are written mostly for Marshal ![]() rank.
rank.
- Therefore, not all descriptions may be accurate in lower ranks.
- You can definitely use many more Auras and Zens effectively at lower ranks due to the lower density of Invader weaponry.